Stack is a fully customizable TCG script, and it is somewhat different from other or current trading card game scripts, so please read the documentation in its entirety to know how to install, configure and use Stack to manage your TCG.
The usage of Stack will allow you to add basic pages for your TCG such as information about your TCG and such through the admin panel—pretty much a content management system like WordPress! However, there are some complex PHP scripts that aren’t allowed to be fully hosted via the database, hence, Stack comes with a list of snippets or plugins that you can add on your page, which will then be explained further.
Pro-tips and Hints #
Just like any other scripts, I will do my best to fully explain these documentations as neatly and as concise as possible for both installing and using Stack for your TCGs. Please do keep in mind that Stack is different from other scripts there is, so make sure to read the entirety of this documentation.
Once Stack has been installed and you’re logged in on the admin panel, kindly read through whatever instructions there is on the documentations before you change anything. Although most of the input fields have their specific guidelines, they are brief and only stands as a reminder/notice. If you think a certain part of the script should be explained more, please feel free to suggest it to me through our community forum.
Before converting TCGs that uses MyTCG or any other script to Stack, backup your databases first! You can do this by using phpMyAdmin or similar from your host and then Export the tables you have for your TCG. If you don’t have access to your database, you will have to contact your host.
Fresh Installation #
If this is your first time installing Stack CMS, carefully follow these step-by-step instructions.
-
Create a database first to use for Stack. You can do this via your server’s control panel under the
MySQL Databasesoption. If you don’t have any control panel access, contact your host to make the database for you. Make sure to remember your database credentials since you will be needing them later on. -
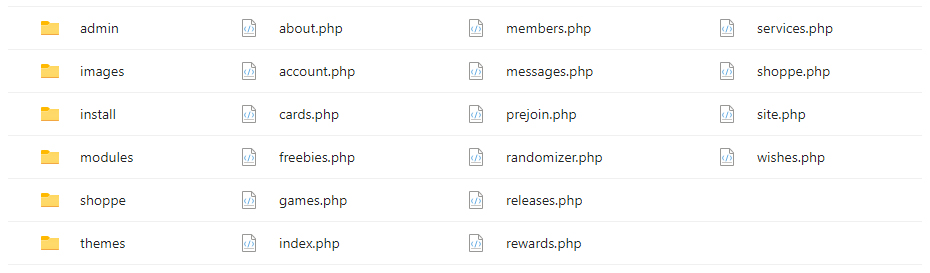
Download the latest version of Stack from the website. Locate your
public_htmlfolder. This is the main folder of your website. If you want your TCG to be atwww.your-site.com, upload the files here. If you want it atwww.your-site.com/tcg, create a folder named tcg and upload there. Upload the .zip file and use your server’s File Manager to extract or unzip the contents. The unzipped file must have the following structure:
-
Go to the
/adminfolder and then open theclass.lib.phpfile. Change the variables to match your database settings. If you don’t know what the values of the database variables are, ask your host for these. Below are the following explanation about these variables:
| $db_server = 'localhost'; | // The database server, usually localhost |
| $db_user = 'myUsername'; | // The username for your database |
| $db_password = 'myPassword'; | // The password for your database |
| $db_database = 'stack_db'; | // The name of your database |
localhost by default. However, some hosting providers have different database servers, like DreamHost—which is dependent on your host’s domain (e.g. mysql.domain.tld). So, if localhost doesn’t work for you and the script tells you that it can’t connect to the server, ask your host for the correct database server.-
Copy all the files and folders of the unzipped archive into your website’s root path where you want to run your TCG. Kindly take note that Stack’s admin panel is located at the
/adminfolder, so all the PHP files outside this folder is what will be displayed on your main TCG’s site. - Once done, direct your browser to run the
/installfolder and then follow the 2-step installation to setup your TCG. The supposed URL to run the install should be:
| // If you have your TCG on a domain: | http://yourdomain.com/install/ |
| // If you have your TCG on a subdomain: | http://tcg.yourdomain.com/install/ |
If your installation is successful and all of the required tables (48 tables in total from the database) has been created—which must have a as a success indicator, click the
Deletebutton to delete the/installfolder and its files.At this point, your installation should be complete and you should be able to login to your account. Go to Stack’s admin panel and configure the rest of your TCG’s settings first (configuration, card categories, card sets, user levels and such) before adding cards and other stuff.
Upgrading Stack #
If you have Stack CMS currently installed and you wish to upgrade it to a newer version, carefully follow these step-by-step instructions.
- Make sure to back up your current Stack CMS database first. You can do this by using phpMyAdmin or similar from your host and then Export the tables you have for your TCG. If you don’t have access to your database, you will have to contact your host.
- Download the latest version of Stack from the website. Unzip or extract the file/archive to a temporary location on your hard drive. Please take note that an upgrade archive only includes the files that has been updated and/or modified from the previous version.
- Copy all the files and folders of the unzipped archive into its rightful folders. This should overwrite the old files that needs to be upgraded.
- Once done, direct your browser to run the
/upgradefolder and then click theUpgrade to 1.x.xbutton. The supposed URL to run the upgrade should be:
If your upgrade is successful, it should show a prompt message and the list of upgraded sections with a as a success indicator. Then click the// If you have your TCG on a domain:
// If you have your TCG on a subdomain:http://yourdomain.com/upgrade/
http://tcg.yourdomain.com/upgrade/Deletebutton to delete the/upgradefolder and its files for security purposes.